The user manual is stored inside the USB drive that came in the box as a PDF file. The manual can be download from AutoTest Product website as well.
Adjust the contrast by using the ‘O’ menu command and pressing the up or down arrows. Refer to your manual for more information.
Charge the battery.
It is okay to leave the unit on charge all the time.
Check that the charge light is on. Measure the output voltage of the charge. Batteries normally have a life of 2-3 years. If the problem persists, call our Service Team.
After a test, press Y to print out the results. If the results displayed are not correct, press NO and repeat the test. Call our Service Team if the problem persists.
Wrong paper type – replace the paper roll. Clean dust and dirt from the printer with a dry brush.
No. Under no circumstances should you oil your printer, this will void your warranty.
The ribbon should be changed with every second roll of paper.
Where do I buy paper and ribbons?
From the online shop on our website or your local distributor. A paper pack consists of 2 paper rolls and 1ribbon.
No. Each sensor is individually calibrated; this must be done by Service Team.
Call our Service Team, and a technician will help you to adjust the meter.
Every test has the same pedal force reading. The pedal sensor wire is broken. Send the meter back for repair to AutoTest Products, or via your local distributor.
The cap should be loose for correct operation.
The brake meter was not firmly secured in the car – repeat the test.
The sensors may need adjustments – turn the brake meter off, then on again to perform a self-check.
Call the Service Team if the problem persists.
A moderate stop from approximately 35 km/h is best. Do not skid the vehicle, as this will provide poor results.
Maxi – 2 years.
It may take one business day to calibrate (excluding shipping and repairs).
Send it to AutoTest Products or through your local distributor.
What should I send when my AutoStop Brake Tester needs service and calibration?
Please send your brake meter, charger, business card
and up to date contact details.
Yes, we require a bond paid by credit card and
dispatch will be same day.Contact us for the hire forms.
AutoStop brake meters measure deceleration (braking efficiency) directly (which is the design parameter used in original homologation) to an accuracy of 2%. Distance is calculated by the meter in its internal computer using the average deceleration measurement, time to stop (from the internal real time clock – accuracy 1.0%) and the assumption that the final speed is zero. The double integration process involved in the mathematics compounds these measurement accuracies and dependent on the shape of the deceleration versus time trace can generate a different result. The difference will be much less than that obtained from using any peak deceleration instrument such as a Tapley meter. The difference is due solely to the mathematics and is not a function of the AutoStop meter. Regulators in certain jurisdictions still use “distance to stop” – because in the 70’s and 80’s direct measurement of braking efficiency to an accuracy of 2%. The regulations will “catch-up” eventually.
No, only one ID can be stored. Please press “N” on the Examiner ID prompt to reset it.
12 months parts and labour. 3 months parts and labour for repairs.
If the time is incorrect by one hour, check the daylight saving setting. Otherwise, contact us and a technician will assist you.
How do I get the latest version of the download software for my brake meter? The latest version of the download software is available for free download on our website.
Check that all cables are connected securely and are not damaged. If you are running Windows 2000, you must use the new Windows-based software, since the old MS-DOS data logging software is not compatible. You can download the latest download software free from AutoTest website.
At the Ready > prompt, press “L” to enter the datalogger menu. Press “C” at the datalogger menu to wipe all saved test data.
The device is not fastened properly, or has been turned on before fastening in the test position. Figure 1 shows correct test position. Needs to be seat belted into the passenger seat with the lid open and closer to the windscreen, not resting on the back
of the chair. Alternatively, you can place on the floor of the passenger seat facing the same direction.
Never hold on your lap for the test, between your legs, or on the floor of the driver’s side
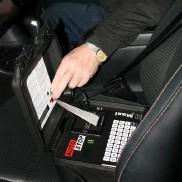
Figure 1: AutoStop brake meter in position ready for testing. Secure in position before turning on and starting any testing.
You can download the latest version of our product manuals on the AutoTest website.
At “ready” press “x” then “A”, pressing “A” repeatedly will toggle between units.
At ready press “T” then “D”, an asterisk will be displayed beside the time indicating Daylight saving.
Press “B” at Ready > screen.
Please check pedal sensor reading. Press “c” at Ready>. Press “c” again, screen should show 0.XX N. Press on pedal sensor and see if the reading goes up accordingly. If there is a delay or the reading is not rising, please contact us.
Please contact our service department with the unit’s serial number at the ready and they will assist you in generating a new code.
The battery is not holding charge and needs to be replaced. Send it in to us for a replcement.
The charging socket may be damaged, or the LED may be blown. Send it in to us for repair. Please also send in with the charger you are using.
The battery is not holding charge and needs to be replaced. Send it in to us for a replacement.
That means 12V non-regulated. It should be shown as 14V if the charger output is regulated. We recommend using the charger that came with the Brake Meter only. Never use a 12V regulated charger, it will drain the battery. You can purchase a new charger through our website or your local distributor.
The charging light only indicate if a charger is plugged in, it won’t change according to the battery level.
My computer does not recognise my brake meter when plugged in via USB.
Please install the USB drivers included with the Brake Meter software, these are located in the ‘USB drivers’ sub-folder of the main folder where the datalogger was installed to (Typically: C:\Program Files (x86)\AutoTest\ Maxi and Heavy Datalogger).
Please contact us for further assistance if this still doesn’t recognise your Brake Meter.
Open ‘Device Manager’ and expand ‘Ports(Com & LPT)’. Search the list of devices for ‘USB Serial Device’ and to the right of its name will be the Com port number.
It is still possible to use a Brake Meter with serial connection on newer PCs that lack serial ports by using a USB-to-serial converter. Compatibility with individal converters may vary however and AutoTest can only offer minimal support in assisting you when using one.
How do I change the display views for km / mph, the unit of acceleration, graph mode etc? Refer to the manual, Section 4.
Battery may be flat- charge unit for 12 to 16 hours. Battery charger has failed – check battery charger output with multimeter, also check condition of fittings. Battery or internal electronics have failed – return unit for servicing.
Battery may be flat- refer below.
Battery may be flat- refer below.
Out of paper = remove printer cover plate and check paper roll. Refer manual Section 4.
Printer ribbon needs replacing- Refer manual Section 5.
Unit not secured into position properly.Foot has been lifted from pedal before vehicle has stopped.
Internal flash memory is not responding or it is faulty. Swtich off the unit and return it for servicing.
Internal flash memory is corrupt or unreadable.Press ‘N’ key to skip formatting. Switch off the unit and return it for servicing. Note: If ‘Y’ key is pressed, all existing data might get erased.
Clock memory is corrupt. Clock battery may be flat. Do NOT press ‘Y’. Press ‘N’and switch off the unit and return the unit for serviing.
Accelerometer chip is faulty. Return the unit for servicing.
Where is the user manual?
The user manual is stored inside the USB drive that came in the box as a PDF file. The manual can be downloaded from AutoTest Product website as well.
Adjust the contrast by using the ‘O’ menu command and pressing the up or down arrows. Refer to your manual for more information.
Charge the battery.
It is okay to leave the unit on charge all the time.
Check that the charge light is on. Measure the output voltage of the charge. Batteries normally have a life of 2-3 years. If the problem persists, call our Service Team.
After a test, press Y to print out the results. If the results displayed are not correct, press NO and repeat the test. Call our Service Team if the problem persists.
Wrong paper type – replace the paper roll. Clean dust and dirt from the printer with a dry brush.
No. Under no circumstances should you oil your printer, this will void your warranty.
The ribbon should be changed with every second roll of paper.
From the online shop on our website or your local distributor. A paper pack consists of 2 paper rolls and 1 ribbon.
No. Each sensor is individually calibrated; this must be done by Service Team.
I need to push the brake pedal very hard to get the AutoStop brake tester to work.
Call our Service Team, and a technician will help you to adjust the meter.
Every test has the same pedal force reading. The pedal sensor wire is broken. Send the meter back for repair to AutoTest Products, or via your local distributor.
The plastic cap on my load cell is loose.
The cap should be loose for correct operation.
The brake meter was not firmly secured in the car – repeat the test.
The sensors may need adjustments – turn the brake meter off, then on again to perform a self-check.
Call the Service Team if the problem persists.
A moderate stop from approximately 35 km/h is best. Do not skid the vehicle, as this will provide poor results.
Heavy – 1 Year.
It may take one business day to calibrate (excluding shipping and repairs).
Send it to AutoTest Products or through your local distributor.
What should I send when my AutoStop Brake Tester needs service and calibration?
Please send your brake meter, charger, business card
and up to date contact details.
Yes, we require a bond paid by credit card and
dispatch will be same day. Contact us for the hire forms.
AutoStop brake meters measure deceleration (braking efficiency) directly (which is the design parameter used in original homologation) to an accuracy of 2%. Distance is calculated by the meter in its internal computer using the average deceleration measurement, time to stop (from the internal real time clock – accuracy 1.0%) and the assumption that the final speed is zero. The double integration process involved in the mathematics compounds these measurement accuracies and dependent on the shape of the deceleration versus time trace can generate a different result. The difference will be much less than that obtained from using any peak deceleration instrument such as a Tapley meter. The difference is due solely to the mathematics and is not a function of the AutoStop Meter. Regulators in certain jurisdictions still use “distance to stop” – because in the 70’s and 80’s direct measurement of braking efficiency to an accuracy of 2%. The regulations will “catch-up” eventually.
No, only one ID can be stored. Please press “N” on the Examiner ID prompt to reset it.
12 months parts and labour. 3 months parts and labour for repairs.
If the time is incorrect by one hour, check the daylight saving setting. Otherwise, contact us
and a technician will assist you.
How do I get the latest version of the download software for my brake meter? The latest version of the download software is available for free download on our website.
My download software / datalogger isn’t working.
Check that all cables are connected securely and are not damaged. If you are running Windows 2000, you must use the new Windows-based software, since the old MS-DOS data logging software is not compatible. You can download the latest download software free from AutoTest website.
How do I clear the datalogger?
At the Ready > prompt, press “L” to enter the datalogger menu. Press “C” at the datalogger menu to wipe all saved test data
Why is the speed wrong?
The device is not fastened properly, or has been turned on before fastening in the test position. Figure 1 shows correct test position. Needs to be seat belted into the passenger seat with the lid open and closer to the windscreen, not resting on the back
of the chair. Alternatively, you can place on the floor of the passenger seat facing the same direction.
Never hold on your lap for the test, between your legs, or on the floor of the driver’s side
Figure 1: AutoStop brake meter in position ready for testing. Secure in position before turning on and starting any testing.
You can download the latest version of our product manuals on the AutoTest website.
At “ready” press “x” then “A”, pressing “A” repeatedly will toggle between units.
At ready press “T” then “D”, an asterisk will be displayed beside the time indicating Daylight saving.
Press “B” at Ready> screen.
Please check pedal sensor reading. Press “c” at Ready>. Press “c” again, screen should show 0.XX N. Press on pedal sensor and see if the reading goes up accordingly. If there is a delay or the reading is not rising, please contact us.
Please contact our service department with the unit’s serial number at the ready and they will assist you in generating a new code.
The battery is not holding charge and needs to be replaced. Send it in to us for a replacement.
The charging socket may be damaged, or the LED may be blown. Send it in to us for repair. Please also send in with the charger you are using.
The battery is not holding charge and needs to be replaced. Send it in to us for a replacement.
That means 12V non-regulated. It should be shown as 14v if the charger output is regulated. We recommend using the charger that came with the Brake meter only. Never use a 12v regulated charger, it will drain the battery. You can purchase a new charger through our website or your local distributor.
The charging light only indicate if a charger is plugged in, it won’t change according to the battery level.
My computer does not recognise my Brake Meter when plugged in via USB.
Please install the USB drivers included with the Brake Meter software, these are located in the ‘USB drivers’ sub-folder of the main folder where the datalogger was installed to (Typically: C:\Program Files (x86)\AutoTest\ Maxi and Heavy Datalogger).
Please contact us for further assistance if this still doesn’t recognise your Brake Meter.
Open ‘Device Manager’ and expand ‘Ports (Com & LPT)’. Search the list of devices for ‘USB Serial Device’ and to the right of its name will be the Com port number.
It is still possible to use a Brake Meter with serial connection on newer PCs that lack serial ports by using a USB-to-serial converter. Compatibility with individual converters may vary however and AutoTest can only offer minimal support in assisting you when using one.
How do I change the display views for km / mph, the unit of acceleration, graph mode etc? Refer to the manual, Section 4.
Battery may be flat- charge unit for 12 to 16 hours. Battery charger has failed – check battery charger output with multimeter, also check condition of fittings. Battery or internal electronics have failed – return unit for servicing.
Battery may be flat- refer below.
Battery may be flat- refer below.
Out of paper = remove printer cover plate and check paper roll. Refer manual Section 4.
Printer ribbon needs replacing- Refer manual Section 5.
Unit not secured into position properly. Foot has been lifted from pedal before vehicle has stopped.
Internal flash memory is not responding or it is faulty. Swtich off the unit and return it for servicing.
Internal flash memory is corrupt or unreadable.Press ‘N’ key to skip formatting. Switch off the unit and return it for servicing. Note: If ‘Y’ key is pressed, all existing data might get erased.
Clock memory is corrupt. Clock battery may be flat. Do NOT press ‘Y’. Press ‘N’ and switch off the unit and return the unit for servicing.
Accelerometer chip is faulty. Return the unit for servicing.
IMPORTANT THINGS TO KNOW

BLUETOOTH PRINTER:
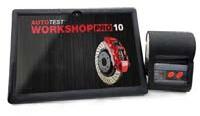 Hold Power button and Volume Down button at the same time for a couple of seconds.
Go to: SETTINGS > ABOUT > VERSION
(See Fig 1 below)
Go to: SETTINGS > ABOUT > TABLET SERIAL
(See Fig 1 below)
When the BrakePro app starts, it shows “Looking for GPS Signal’ for a long time and I can’t use the unit.
Your unit is having trouble acquiring a signal, take the unit outside. Alternatively connect your unit to a Wi-Fi network to assist in establishing a connection, this can reduce start up time considerably.
My brake software is expired. How do I reactivate it?
Through the Workshop Manager app. You need to make sure that you have the latest version of the Workshop Manager app to reactivate your license. If the Workshop Manager app prompts you to download an update, press on DOWNLOAD and wait for the update file to be downloaded into your Workshop Pro 10 Tablet. Once it is done, a prompt saying DO YOU WANT TO INSTALL AN UPDATE TO THIS APPLICATION will be displayed. Press INSTALL and wait for the installation to finish. Once done, press OPEN to open the newly updated Workshop Manager app. You can then proceed to reactivate your license by pressing PURCHASE LICENSE and follow the on-screen instructions to proceed. If the BrakePro app still do not recognise the new license, restart the BrakePro app.
How do I know what version of software I have?
Go to: SETTINGS > ABOUT > VERSION
(See Fig 1 below)
Where can I find my Serial Number?
Go to: SETTINGS > ABOUT > TABLET SERIAL
(See Fig 1 below)
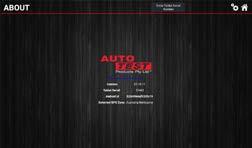
Figure 1: The About screen shows your softwear version number, tablet serial number, android ID, and your GPS location zone.
When should I calibrate my Workshop Pro?
Calibration is required yearly. This can be done yourself through BrakePro app by going to SETTINGS
*IN NSW YOU MUST SEND YOUR WORKSHOP PRO AND PEDAL EFFORT SENSOR TO US FOR YEARLY CALIBRATION.
When do I need to send in my Workshop Pro?
You do not need to*. If you are having issues with the Workshop Pro (i.e. Won’t charge or won’t turn on), you can take the device to your nearest Distributor. Alternatively, call our service line ( 3 8840 3016 ) for advice before sending your unit back.
My unit prompts me to update the BrakePro app but shows an error when it tries to install.
Contact Service Team and they’ll walk you through this issue.
Figure 2: Workshop Pro in position ready for testing. If the unit is moving in the seat, place on the floor of the passenger seat. Supplied velcro will secure in place.
When activating my unit, I get an error such as ‘Address field too long’ or similar.
Please check your address. If the address is very long you may need to abbreviate it. Do not use special characters such as commas or slashes, as these will trigger errors. Just leave a space in their place when possible.
The app is running slowly when sorting out stored tests.
Please clean up tests regularly by transferring them to the computer using the USB cable.
The time on my unit is wrong, how do I fix this?
Change the time to AUTOMATIC if you had changed it manually. If it’s on network time but still incorrect, connect to a network to get the updated time. The time zone may be wrong, so swipe up on the bottom of the screen and press the circle button. Once you’re on the home screen swipe on the middle of the screen to open up the list of apps. Open ‘Settings’ and scroll down to select System Settings. Then select Date & Time. Switch off Automatic Time Zone if it’s on and then set correct Time Zone manually if that is wrong.
My results are in the wrong units, how do I change them?
Open Settings from the Brake Pro app’s main menu and then select Test Results Settings. Choose your desired Units and then press either the house or gears icons to save your choice. You can also change the units for decelaration on the test results screen by pressing on the decelaration readings and choosing from the menu that pops up.
Why am I getting a speed error?
The Workshop Pro is moving relative to the vehicle. This is a common error when the unit is not secured properly to the vehicle. See Figure 2 on previous page. The supplied Velcro will stop your Workshop Pro from moving,when attached to the carpet floor on the passenger side of the vehicle. Never hold in your hand for the test, or between your legs, or on the floor of the driver’s side.
How do I delete a saved result?
To delete individual saved test results, open Database on the main App menu. Hold your finger down on the test you want deleted and it will be highlighted in red. You can then select multiple tests to be deleted. Click the trash can in top right corner to delete the selected tests.