Road transport is a source of air pollutants which can have adverse effects at various scales. The air pollutants which are currently causing greatest concern in terms of local air quality, primarily because of their impacts on human health, are airborne PM, NO2 and ground-level ozone5. Road transport is an important contributor to all three. Emissions of nitrogen oxides (NOx) from road vehicles are also implicated in regional phenomena such as acidification, eutrophication and loss of biodiversity, as well as the formation of secondary PM in the atmosphere. Moreover, road transport is a major source of the greenhouse gases carbon dioxide (CO2), methane (CH4) and nitrous oxide (N2O).
The significance of road transport as a source of air pollution can be illustrated by reference to sectoral emissions for the EU-27 countries, based on submissions to the UNECE Convention on Long-Range Transboundary Air Pollution (CLRTAP). Road transport is a significant contributor to NOx emissions (41% in Europe) and is also a major contributor to PM emissions. In urban areas its impact is even greater due to the density of the road network, the volume of traffic, and the close proximity of the population to the emission source.
Legislation and strategies to reduce exhaust emissions from road vehicles have been in place for some time. Calculations have established that emissions of regulated pollutants from road transport have been reducing as controls on vehicles and fuels have tightened. However, in many urban areas the concentrations of NO2 and PM10 (particulate matter with an aerodynamic diameter of less than 10 μm) still frequently exceed health-based limits and are not decreasing.
The importance of NO2 and particulate matter is explained in more detail below.
Nitrogen dioxide
NO2 is an irritant and oxidant which can damage cell membranes and proteins. It has been linked to a range of adverse health effects, including asthma and cancer, but the most consistent association has been found with respiratory outcomes.
NO2 is predominantly a secondary pollutant, its major atmospheric source being the oxidation of NO emitted from combustion sources – notably road vehicle exhaust. However, some NO2 is emitted directly from vehicles, and this is commonly referred to as ‘primary NO2’. Emissions of NOx from vehicle exhaust are regulated at type approval, but NO2 emissions per se are not.
Analyses have indicated that a significant proportion of ambient NO2 must be emitted directly from vehicle exhaust, and that the direct road traffic contribution to ambient NO2 has increased in recent years.
Two contributing factors have been cited
(i) Diesel vehicles emit more NOx than petrol vehicles, and with a larger proportion of NO2 in NOx.
(ii) The average value of NO2 in diesel exhaust is increasing. This appears to be linked to the growth in the use of specific after-treatment technologies in modern diesel vehicles which involve in situ generation of NO2, such as catalytically regenerative particle filters.
Background concentrations of ozone are also increasing. As the ozone concentration increases the amount of NO converted to NO2 increases.
Furthermore, it seems likely that real-world NOx emissions from road vehicles are not decreasing as rapidly as models are predicting. Whilst this does not, in itself, affect actual NO2 concentrations, it does suggest that NOx controls have not been sufficiently stringent, or that vehicles are not performing as expected.
The overall consequence is that there is now a great deal of interest in the tighter regulation of NOx and NO2 emissions from diesel vehicles and the effects of different after-treatment devices. Direct-injection petrol engines with after-treatment technologies will also have an important impact on NOx emissions in the future.
Particulate matter
Epidemiological studies have shown that concentrations of airborne PM are correlated with hospital admissions and death rates. Initially, the mass concentration of airborne particles with a diameter of less than 10 μm (PM10) is identified as a key metric in relation to health outcomes. However, more recent research has suggested that smaller particles are more important. Attention has focused on particles having a diameter of less than 2.5 μm (PM2.5), although there is still a debate as to whether it is actually the mass of even smaller particles, or indeed a non-mass metric such as particle number (PN)7, that is primarily responsible for health effects. In addition to health, airborne particles are responsible for a range of other adverse effects, including nuisance and visibility reduction.
Particles in diesel exhaust have a range of sizes, and the shape of the size distribution depends on whether the weighting is by number or by mass. There are three distinct size modes: the nucleation mode (also referred to as nuclei or nanoparticles), the accumulation mode, and the coarse mode. The nucleation mode has traditionally been defined as particles with a diameter of less than 50 nm. Accumulation mode particles range in size from around 50 nm to around 1 μm, with particles smaller than 0.1 μm being referred to as ‘ultrafine’. The nucleation mode contains many more particles than the accumulation mode, although because each particle is so small the total mass is lower. The coarse mode consists of particles larger than around 1 μm.
The main implication of the particle size distribution in vehicle exhaust is that the instruments used in testing need to be sensitive enough to measure particles in the relevant size.
Regulation of exhaust emissions at type approval
The primary tool for combating air pollution from road transport is vehicle emission legislation. There are currently two main levels of emission legislation: type approval, and periodic in-service/roadworthiness technical inspection.
Emission tests are normally required for the type approval of all new passenger car (M1, M2) and light-duty vehicles (N1, N2), and for the engines used in heavy-duty vehicles. Emission limits have been applied to vehicles and engines at the type approval stage since the early 1970s. The exhaust pollutants which are regulated are CO, unburnt hydrocarbons (HC), NOx and PM. The limits have been reduced in stages since they were first introduced (through progressive ‘Euro’ standards), and changes have been made to the test methods to make them more realistic and effective. Emission-control technologies have developed accordingly.
For cars and light-duty vehicles the test procedures and limit values have been consolidated in the Euro 5 and Euro 6 legislation (Regulation (EC) No. 692/2008). In the exhaust emission test a production vehicle is placed on a power-absorbing chassis dynamometer. The driver must follow a driving cycle and the vehicle’s emissions are collected and analysed. Emissions are measured over the New European Driving Cycle (NEDC), which is composed of low-speed ‘urban’ segments and one high-speed ‘extra-urban’ segment. The vehicle exhaust gases are diluted with filtered air to prevent condensation or reaction between the exhaust gas components. Dedicated analysers are used for CO, NOx, HC and carbon dioxide8. For diesel vehicles up to and including Euro 4, PM was collected separately from the other pollutants on a filter. For Euro 5 and Euro 6 vehicles PM mass and PN are measured using the new Particulate Measurement procedure. The PN limit is designed to prevent the possibility of the PM mass limit being met using technologies that would enable a high number of ultrafine particles (<0.1 μm diameter) to pass.
Periodic technical inspection in the EU
The purpose of the Periodic inspection emission test is to allow authorities to check that in-service vehicles are well maintained and conform as far as possible to their design emission levels. However, whilst type approval tests target the manufacturer, are relatively detailed, and require specialist and expensive laboratory equipment, by necessity a lower level of sophistication applies to in-service emission tests. In-service tests target the vehicle owner, are based on shorter, simplified operations of the vehicle, involve the measurement of fewer pollutants (typically CO, HC and diesel smoke), and make use of equipment that is less precise and less expensive than that used in the laboratory.
Periodic inspections are conducted every one or two years whereas In-service inspections are designed to identify large faults rather than a gradual deterioration in the control of emissions. All types of road vehicle (passenger cars, light-duty vehicles and heavy-duty vehicles) are usually handled using similar procedures.
Petrol Vehicles
Test procedure
For petrol vehicles the first step is a visual inspection of the emission-control equipment fitted by the manufacturer to determine if it is absent, modified or obviously defective, and to identify any leaks which would affect the emission measurements.
For vehicles without an advanced emission-control system, such as a three-way catalytic converter that is lambda-controlled, after a reasonable period of engine conditioning the CO content of the exhaust gases is measured when the engine is idling.
For controlled vehicles the lambda value and the CO content of the exhaust are measured at the natural engine idle speed and at high idle speed (at least 2,000 rpm). Again, the engine is conditioned in accordance with the vehicle manufacturer’s recommendations.
No external load is applied to the engine in any of the tests.
Diesel vehicles
Test procedure
In the diesel smoke opacity test the vehicle is operated through a sequence of so-called ‘free accelerations’ with the engine under no external load, the gear lever in neutral and the clutch engaged. The inspection is done in the following steps:
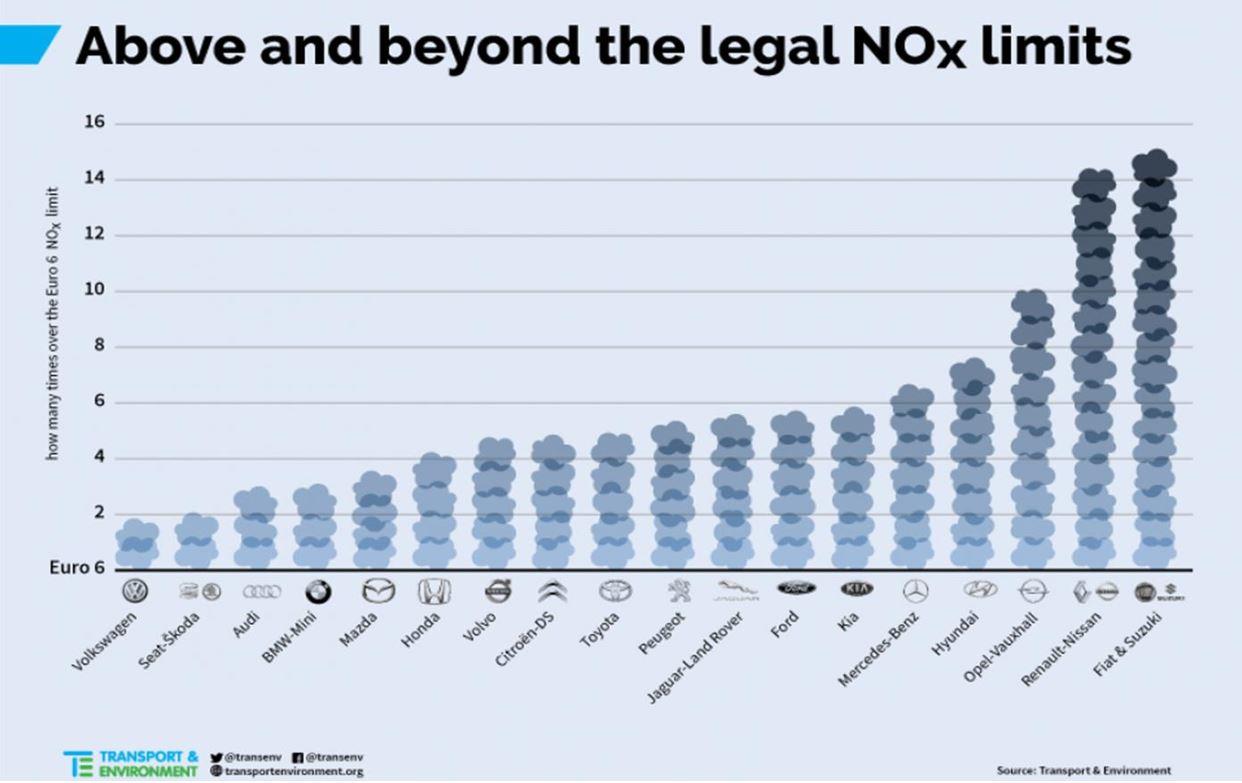
On the 18th September 2015, the Environmental Protection Agency USEPA, issued a notice of violation of the Clean Air Act to Volkswagen AG, Audi AG and Volkswagen Group of America, Inc. The notice of violation alleges that four cylinder Volkswagen and Audi diesel cars from model years 2009-2015 included software that circumvents USEPA emission standards for certain air pollutants.
There is now a need for the procedures and instruments to properly measure exhaust emissions during Periodic inspections to be updated and implemented in the light of today’s technology and capability of modern measurement devices.
In Europe, there is consideration of updating their Periodic inspections due to this problem. The reality is that Australia is already consistently several years behind EU standards as the European Directive adopted the Emission Standard Euro 5 in 2011 but Australia is only up to Euro 4.
If Australia is to achieve the Australian Government’s 2030 greenhouse gas emissions target of 26-28 per cent of 2005 levels, and net zero by 2050, then the Australian Government needs to implement more stringent standards for noxious air pollutant emissions and a standards regime for fuel efficiency (CO2).
While Australia’s air quality is considered good by international standards, our increasingly urbanised and aging population may be more susceptible to the health impacts of noxious emissions. This is particularly pertinent when considering that in 2012, 66% of Australians lived in a capital city and that combined population of our four largest cities is projected to increase by around 45% (5.8 million people) to 18.6 million by 2031”.
It is imperative the Australian Government strengthens its vehicle emissions standards and practices for all vehicles, this should encompass the following key points.
Fuel standards are the obvious roadblock to implementation of Euro6, however the implementation of Euro6 vehicles with substandard fuel, would limit the available benefits, – lower fuel consumption, less toxic emissions.
In Australia, we take the manufacturers and importers word that their cars meet the emission standards. Vehicles are tested by the manufacturer in accordance with ADR’s whereas in Europe all manufactured and imported models are tested to ensure emission standards are met and are tested during their lifetime (depending on model and age) to ensure the car continues to meet the emission standard. Euro 6 emissions standards for light vehicle became mandatory in Europe from September 2014 and equivalent standards are currently in force in the US and Japan. The Euro V1 emissions standards for heavy vehicles commence in the US and Japan 2010
It is widely recognised that vehicle emission levels are affected by the vehicle condition, service history, fuel quality, vehicle usage and environmental conditions. As demonstrated by some manufacturers, the emission levels in “real world” conditions may differ from the manufacturers standardised.
Effective Emissions Testing
Test the gas efficiency of a vehicle with AutoTest’s combined AutoGas® 5 Gas Analyser and AutoSmoke® Opacity Meter. Battery operated, they measure the contents of the exhaust gas and lets you know how efficient a vehicle is at reducing the amount of pollutant gases being released into the atmosphere.
The user manual is stored inside the USB drive that came in the box as a PDF file. The manual can be download from AutoTest Product website as well.
Adjust the contrast by using the ‘O’ menu command and pressing the up or down arrows. Refer to your manual for more information.
Charge the battery.
It is okay to leave the unit on charge all the time.
Check that the charge light is on. Measure the output voltage of the charge. Batteries normally have a life of 2-3 years. If the problem persists, call our Service Team.
After a test, press Y to print out the results. If the results displayed are not correct, press NO and repeat the test. Call our Service Team if the problem persists.
Wrong paper type – replace the paper roll. Clean dust and dirt from the printer with a dry brush.
No. Under no circumstances should you oil your printer, this will void your warranty.
The ribbon should be changed with every second roll of paper.
Where do I buy paper and ribbons?
From the online shop on our website or your local distributor. A paper pack consists of 2 paper rolls and 1ribbon.
No. Each sensor is individually calibrated; this must be done by Service Team.
Call our Service Team, and a technician will help you to adjust the meter.
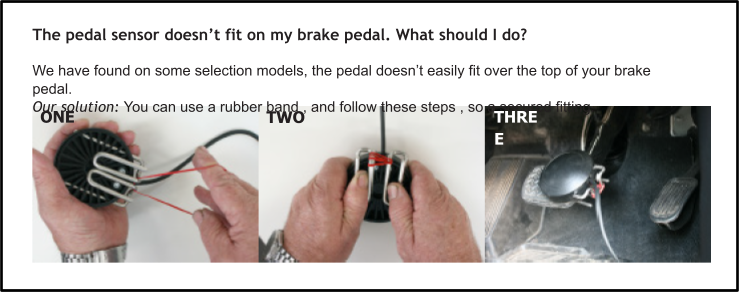
Every test has the same pedal force reading. The pedal sensor wire is broken. Send the meter back for repair to AutoTest Products, or via your local distributor.
The cap should be loose for correct operation.
The brake meter was not firmly secured in the car – repeat the test.
The sensors may need adjustments – turn the brake meter off, then on again to perform a self-check.
Call the Service Team if the problem persists.
A moderate stop from approximately 35 km/h is best. Do not skid the vehicle, as this will provide poor results.
Maxi – 2 years.
It may take one business day to calibrate (excluding shipping and repairs).
Send it to AutoTest Products or through your local distributor.
What should I send when my AutoStop Brake Tester needs service and calibration?
Please send your brake meter, charger, business card
and up to date contact details.
Yes, we require a bond paid by credit card and
dispatch will be same day.Contact us for the hire forms.
AutoStop brake meters measure deceleration (braking efficiency) directly (which is the design parameter used in original homologation) to an accuracy of 2%. Distance is calculated by the meter in its internal computer using the average deceleration measurement, time to stop (from the internal real time clock – accuracy 1.0%) and the assumption that the final speed is zero. The double integration process involved in the mathematics compounds these measurement accuracies and dependent on the shape of the deceleration versus time trace can generate a different result. The difference will be much less than that obtained from using any peak deceleration instrument such as a Tapley meter. The difference is due solely to the mathematics and is not a function of the AutoStop meter. Regulators in certain jurisdictions still use “distance to stop” – because in the 70’s and 80’s direct measurement of braking efficiency to an accuracy of 2%. The regulations will “catch-up” eventually.
No, only one ID can be stored. Please press “N” on the Examiner ID prompt to reset it.
12 months parts and labour. 3 months parts and labour for repairs.
If the time is incorrect by one hour, check the daylight saving setting. Otherwise, contact us and a technician will assist you.
How do I get the latest version of the download software for my brake meter? The latest version of the download software is available for free download on our website.
Check that all cables are connected securely and are not damaged. If you are running Windows 2000, you must use the new Windows-based software, since the old MS-DOS data logging software is not compatible. You can download the latest download software free from AutoTest website.
At the Ready > prompt, press “L” to enter the datalogger menu. Press “C” at the datalogger menu to wipe all saved test data.
The device is not fastened properly, or has been turned on before fastening in the test position. Figure 1 shows correct test position. Needs to be seat belted into the passenger seat with the lid open and closer to the windscreen, not resting on the back
of the chair. Alternatively, you can place on the floor of the passenger seat facing the same direction.
Never hold on your lap for the test, between your legs, or on the floor of the driver’s side
Figure 1: AutoStop brake meter in position ready for testing. Secure in position before turning on and starting any testing.
You can download the latest version of our product manuals on the AutoTest website.
At “ready” press “x” then “A”, pressing “A” repeatedly will toggle between units.
At ready press “T” then “D”, an asterisk will be displayed beside the time indicating Daylight saving.
Press “B” at Ready > screen.
Please check pedal sensor reading. Press “c” at Ready>. Press “c” again, screen should show 0.XX N. Press on pedal sensor and see if the reading goes up accordingly. If there is a delay or the reading is not rising, please contact us.
Please contact our service department with the unit’s serial number at the ready and they will assist you in generating a new code.
The battery is not holding charge and needs to be replaced. Send it in to us for a replcement.
The charging socket may be damaged, or the LED may be blown. Send it in to us for repair. Please also send in with the charger you are using.
The battery is not holding charge and needs to be replaced. Send it in to us for a replacement.
That means 12V non-regulated. It should be shown as 14V if the charger output is regulated. We recommend using the charger that came with the Brake Meter only. Never use a 12V regulated charger, it will drain the battery. You can purchase a new charger through our website or your local distributor.
The charging light only indicate if a charger is plugged in, it won’t change according to the battery level.
My computer does not recognise my brake meter when plugged in via USB.
Please install the USB drivers included with the Brake Meter software, these are located in the ‘USB drivers’ sub-folder of the main folder where the datalogger was installed to (Typically: C:\Program Files (x86)\AutoTest\ Maxi and Heavy Datalogger).
Please contact us for further assistance if this still doesn’t recognise your Brake Meter.
Open ‘Device Manager’ and expand ‘Ports(Com & LPT)’. Search the list of devices for ‘USB Serial Device’ and to the right of its name will be the Com port number.
It is still possible to use a Brake Meter with serial connection on newer PCs that lack serial ports by using a USB-to-serial converter. Compatibility with individal converters may vary however and AutoTest can only offer minimal support in assisting you when using one.
How do I change the display views for km / mph, the unit of acceleration, graph mode etc? Refer to the manual, Section 4.
Battery may be flat- charge unit for 12 to 16 hours. Battery charger has failed – check battery charger output with multimeter, also check condition of fittings. Battery or internal electronics have failed – return unit for servicing.
Battery may be flat- refer below.
Battery may be flat- refer below.
Out of paper = remove printer cover plate and check paper roll. Refer manual Section 4.
Printer ribbon needs replacing- Refer manual Section 5.
Unit not secured into position properly.Foot has been lifted from pedal before vehicle has stopped.
Internal flash memory is not responding or it is faulty. Swtich off the unit and return it for servicing.
Internal flash memory is corrupt or unreadable.Press ‘N’ key to skip formatting. Switch off the unit and return it for servicing. Note: If ‘Y’ key is pressed, all existing data might get erased.
Clock memory is corrupt. Clock battery may be flat. Do NOT press ‘Y’. Press ‘N’and switch off the unit and return the unit for serviing.
Accelerometer chip is faulty. Return the unit for servicing.
Where is the user manual?
The user manual is stored inside the USB drive that came in the box as a PDF file. The manual can be downloaded from AutoTest Product website as well.
Adjust the contrast by using the ‘O’ menu command and pressing the up or down arrows. Refer to your manual for more information.
Charge the battery.
It is okay to leave the unit on charge all the time.
Check that the charge light is on. Measure the output voltage of the charge. Batteries normally have a life of 2-3 years. If the problem persists, call our Service Team.
After a test, press Y to print out the results. If the results displayed are not correct, press NO and repeat the test. Call our Service Team if the problem persists.
Wrong paper type – replace the paper roll. Clean dust and dirt from the printer with a dry brush.
No. Under no circumstances should you oil your printer, this will void your warranty.
The ribbon should be changed with every second roll of paper.
From the online shop on our website or your local distributor. A paper pack consists of 2 paper rolls and 1 ribbon.
No. Each sensor is individually calibrated; this must be done by Service Team.
I need to push the brake pedal very hard to get the AutoStop brake tester to work.
Call our Service Team, and a technician will help you to adjust the meter.
Every test has the same pedal force reading. The pedal sensor wire is broken. Send the meter back for repair to AutoTest Products, or via your local distributor.
The plastic cap on my load cell is loose.
The cap should be loose for correct operation.
The brake meter was not firmly secured in the car – repeat the test.
The sensors may need adjustments – turn the brake meter off, then on again to perform a self-check.
Call the Service Team if the problem persists.
A moderate stop from approximately 35 km/h is best. Do not skid the vehicle, as this will provide poor results.
Heavy – 1 Year.
It may take one business day to calibrate (excluding shipping and repairs).
Send it to AutoTest Products or through your local distributor.
What should I send when my AutoStop Brake Tester needs service and calibration?
Please send your brake meter, charger, business card
and up to date contact details.
Yes, we require a bond paid by credit card and
dispatch will be same day. Contact us for the hire forms.
AutoStop brake meters measure deceleration (braking efficiency) directly (which is the design parameter used in original homologation) to an accuracy of 2%. Distance is calculated by the meter in its internal computer using the average deceleration measurement, time to stop (from the internal real time clock – accuracy 1.0%) and the assumption that the final speed is zero. The double integration process involved in the mathematics compounds these measurement accuracies and dependent on the shape of the deceleration versus time trace can generate a different result. The difference will be much less than that obtained from using any peak deceleration instrument such as a Tapley meter. The difference is due solely to the mathematics and is not a function of the AutoStop Meter. Regulators in certain jurisdictions still use “distance to stop” – because in the 70’s and 80’s direct measurement of braking efficiency to an accuracy of 2%. The regulations will “catch-up” eventually.
No, only one ID can be stored. Please press “N” on the Examiner ID prompt to reset it.
12 months parts and labour. 3 months parts and labour for repairs.
If the time is incorrect by one hour, check the daylight saving setting. Otherwise, contact us
and a technician will assist you.
How do I get the latest version of the download software for my brake meter? The latest version of the download software is available for free download on our website.
My download software / datalogger isn’t working.
Check that all cables are connected securely and are not damaged. If you are running Windows 2000, you must use the new Windows-based software, since the old MS-DOS data logging software is not compatible. You can download the latest download software free from AutoTest website.
How do I clear the datalogger?
At the Ready > prompt, press “L” to enter the datalogger menu. Press “C” at the datalogger menu to wipe all saved test data
Why is the speed wrong?
The device is not fastened properly, or has been turned on before fastening in the test position. Figure 1 shows correct test position. Needs to be seat belted into the passenger seat with the lid open and closer to the windscreen, not resting on the back
of the chair. Alternatively, you can place on the floor of the passenger seat facing the same direction.
Never hold on your lap for the test, between your legs, or on the floor of the driver’s side
Figure 1: AutoStop brake meter in position ready for testing. Secure in position before turning on and starting any testing.
You can download the latest version of our product manuals on the AutoTest website.
At “ready” press “x” then “A”, pressing “A” repeatedly will toggle between units.
At ready press “T” then “D”, an asterisk will be displayed beside the time indicating Daylight saving.
Press “B” at Ready> screen.
Please check pedal sensor reading. Press “c” at Ready>. Press “c” again, screen should show 0.XX N. Press on pedal sensor and see if the reading goes up accordingly. If there is a delay or the reading is not rising, please contact us.
Please contact our service department with the unit’s serial number at the ready and they will assist you in generating a new code.
The battery is not holding charge and needs to be replaced. Send it in to us for a replacement.
The charging socket may be damaged, or the LED may be blown. Send it in to us for repair. Please also send in with the charger you are using.
The battery is not holding charge and needs to be replaced. Send it in to us for a replacement.
That means 12V non-regulated. It should be shown as 14v if the charger output is regulated. We recommend using the charger that came with the Brake meter only. Never use a 12v regulated charger, it will drain the battery. You can purchase a new charger through our website or your local distributor.
The charging light only indicate if a charger is plugged in, it won’t change according to the battery level.
My computer does not recognise my Brake Meter when plugged in via USB.
Please install the USB drivers included with the Brake Meter software, these are located in the ‘USB drivers’ sub-folder of the main folder where the datalogger was installed to (Typically: C:\Program Files (x86)\AutoTest\ Maxi and Heavy Datalogger).
Please contact us for further assistance if this still doesn’t recognise your Brake Meter.
Open ‘Device Manager’ and expand ‘Ports (Com & LPT)’. Search the list of devices for ‘USB Serial Device’ and to the right of its name will be the Com port number.
It is still possible to use a Brake Meter with serial connection on newer PCs that lack serial ports by using a USB-to-serial converter. Compatibility with individual converters may vary however and AutoTest can only offer minimal support in assisting you when using one.
How do I change the display views for km / mph, the unit of acceleration, graph mode etc? Refer to the manual, Section 4.
Battery may be flat- charge unit for 12 to 16 hours. Battery charger has failed – check battery charger output with multimeter, also check condition of fittings. Battery or internal electronics have failed – return unit for servicing.
Battery may be flat- refer below.
Battery may be flat- refer below.
Out of paper = remove printer cover plate and check paper roll. Refer manual Section 4.
Printer ribbon needs replacing- Refer manual Section 5.
Unit not secured into position properly. Foot has been lifted from pedal before vehicle has stopped.
Internal flash memory is not responding or it is faulty. Swtich off the unit and return it for servicing.
Internal flash memory is corrupt or unreadable.Press ‘N’ key to skip formatting. Switch off the unit and return it for servicing. Note: If ‘Y’ key is pressed, all existing data might get erased.
Clock memory is corrupt. Clock battery may be flat. Do NOT press ‘Y’. Press ‘N’ and switch off the unit and return the unit for servicing.
Accelerometer chip is faulty. Return the unit for servicing.
IMPORTANT THINGS TO KNOW

BLUETOOTH PRINTER:
 Hold Power button and Volume Down button at the same time for a couple of seconds.
Go to: SETTINGS > ABOUT > VERSION
(See Fig 1 below)
Go to: SETTINGS > ABOUT > TABLET SERIAL
(See Fig 1 below)
When the BrakePro app starts, it shows “Looking for GPS Signal’ for a long time and I can’t use the unit.
Your unit is having trouble acquiring a signal, take the unit outside. Alternatively connect your unit to a Wi-Fi network to assist in establishing a connection, this can reduce start up time considerably.
My brake software is expired. How do I reactivate it?
Through the Workshop Manager app. You need to make sure that you have the latest version of the Workshop Manager app to reactivate your license. If the Workshop Manager app prompts you to download an update, press on DOWNLOAD and wait for the update file to be downloaded into your Workshop Pro 10 Tablet. Once it is done, a prompt saying DO YOU WANT TO INSTALL AN UPDATE TO THIS APPLICATION will be displayed. Press INSTALL and wait for the installation to finish. Once done, press OPEN to open the newly updated Workshop Manager app. You can then proceed to reactivate your license by pressing PURCHASE LICENSE and follow the on-screen instructions to proceed. If the BrakePro app still do not recognise the new license, restart the BrakePro app.
How do I know what version of software I have?
Go to: SETTINGS > ABOUT > VERSION
(See Fig 1 below)
Where can I find my Serial Number?
Go to: SETTINGS > ABOUT > TABLET SERIAL
(See Fig 1 below)
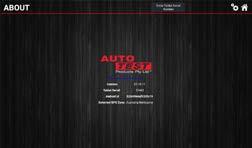
Figure 1: The About screen shows your softwear version number, tablet serial number, android ID, and your GPS location zone.
When should I calibrate my Workshop Pro?
Calibration is required yearly. This can be done yourself through BrakePro app by going to SETTINGS
*IN NSW YOU MUST SEND YOUR WORKSHOP PRO AND PEDAL EFFORT SENSOR TO US FOR YEARLY CALIBRATION.
When do I need to send in my Workshop Pro?
You do not need to*. If you are having issues with the Workshop Pro (i.e. Won’t charge or won’t turn on), you can take the device to your nearest Distributor. Alternatively, call our service line ( 3 8840 3016 ) for advice before sending your unit back.
My unit prompts me to update the BrakePro app but shows an error when it tries to install.
Contact Service Team and they’ll walk you through this issue.
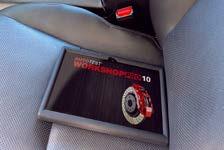
Figure 2: Workshop Pro in position ready for testing. If the unit is moving in the seat, place on the floor of the passenger seat. Supplied velcro will secure in place.
When activating my unit, I get an error such as ‘Address field too long’ or similar.
Please check your address. If the address is very long you may need to abbreviate it. Do not use special characters such as commas or slashes, as these will trigger errors. Just leave a space in their place when possible.
The app is running slowly when sorting out stored tests.
Please clean up tests regularly by transferring them to the computer using the USB cable.
The time on my unit is wrong, how do I fix this?
Change the time to AUTOMATIC if you had changed it manually. If it’s on network time but still incorrect, connect to a network to get the updated time. The time zone may be wrong, so swipe up on the bottom of the screen and press the circle button. Once you’re on the home screen swipe on the middle of the screen to open up the list of apps. Open ‘Settings’ and scroll down to select System Settings. Then select Date & Time. Switch off Automatic Time Zone if it’s on and then set correct Time Zone manually if that is wrong.
My results are in the wrong units, how do I change them?
Open Settings from the Brake Pro app’s main menu and then select Test Results Settings. Choose your desired Units and then press either the house or gears icons to save your choice. You can also change the units for decelaration on the test results screen by pressing on the decelaration readings and choosing from the menu that pops up.
Why am I getting a speed error?
The Workshop Pro is moving relative to the vehicle. This is a common error when the unit is not secured properly to the vehicle. See Figure 2 on previous page. The supplied Velcro will stop your Workshop Pro from moving,when attached to the carpet floor on the passenger side of the vehicle. Never hold in your hand for the test, or between your legs, or on the floor of the driver’s side.
How do I delete a saved result?
To delete individual saved test results, open Database on the main App menu. Hold your finger down on the test you want deleted and it will be highlighted in red. You can then select multiple tests to be deleted. Click the trash can in top right corner to delete the selected tests.